How to copy sheets from one Revit file to another
Use Insert Views from File for empty or drafting-only sheets, then rebuild model views and check the destination title block, sheet data and layout.
To copy sheets from one Revit file to another, use Insert Views from File for empty sheets or sheets containing only drafting views. The command also brings in eligible schedules and drafting views; rendered images are supported too. A sheet carrying floor plans, sections or elevations can't travel with those views: duplicate it as an empty sheet in the source, insert the duplicate, then place the destination model's own views on it.
Use full Revit 2027 in English, with source and destination saved in that release, and work in a copy of the destination before bringing in shared settings. Open an older source in Revit 2027 and save it as a copy first: opening an earlier-release model upgrades it, and once that upgrade is saved, the file no longer opens in its old release. A source saved in a newer release than the destination can't be used, because Revit models aren't backward-compatible; read what saving a Revit file to an older version can and can't do before planning a transfer across releases.
Revit LT 2027 has the same Insert Views from File, Duplicate Sheet and Transfer Project Standards routes, with one stop: an LT project can't insert views and sheets from a full Revit file. Standards still cross: Transfer Project Standards can bring settings from a Revit project into LT, and LT ignores any it doesn't support. I'd transfer a small, named set of views first in either product, because a sheet that looks familiar can still carry the previous project's notes and identity.
Choose the method by the content
A sheet is a container for drawings and schedules; the drawing placed on it has a viewport. Check the sheet's title-block family, each placed view and the project's shared standards separately.
| Method | Content or settings affected | Use it when |
|---|---|---|
| Insert Views from File | Eligible views, empty sheets and sheets containing only drafting views | You need reusable details, schedules or a sheet without model views |
| Duplicate Sheet, then Insert Views from File | A sheet's title block and its information; the placed views stay in the source | The source sheet holds plans, sections or elevations |
| Clipboard | Eligible selected elements; a placed legend has an explicit cross-model sheet route | You need a supported selection or a placed legend |
| Transfer Project Standards | Selected types and project settings | The destination needs the source's graphics or other named standards |
| Project template | The starting views, sheets and settings of future projects | The same documentation framework belongs in the next project too |
The supported list in Autodesk's view and sheet reuse procedure does not include model floor plans, elevations or sections. Create those views from the destination model. Bring in the drafting detail separately when you need its drawn documentation.
Insert empty sheets and eligible views into the destination
- Open the destination project, where the reused documentation should appear.
- Click Insert tab > Import panel > Insert from File drop-down > Insert Views from File.
- In the Open dialog, select the source project and click Open.
- In Insert Views, select the eligible views or sheets you need, then click OK.
- Find the copied views and sheets in the destination's Project Browser, where Revit lists them.
Before selecting more sheets, open one copied sheet. On a long list, the Project Browser search finds it by name, and a double-click opens it. Its title block, sheet name and number, notes and view titles all arrived from the old project, so compare them with the destination set and change the sheet-specific fields in the Properties palette, or click their placeholder text in the title block.
A sheet that holds model views won't come across with Insert Views from File, so Autodesk's sheet transfer guidance carries an empty duplicate of it instead:
- Open the source project, or a saved copy of it if the original should stay as it is.
- In the Project Browser, right-click the sheet and click Duplicate Sheet > Duplicate Empty Sheet (in Revit since 2022.1). Save the file.
- In the destination, run Insert Views from File as above and select the empty duplicate.
- Open the inserted sheet and drag the destination model's own views onto it from the Project Browser.
Duplicate Empty Sheet keeps only the title block, its information and any project or shared parameters the title block uses. The placed views, schedules, legends and annotations stay on the original sheet, which remains your layout reference.
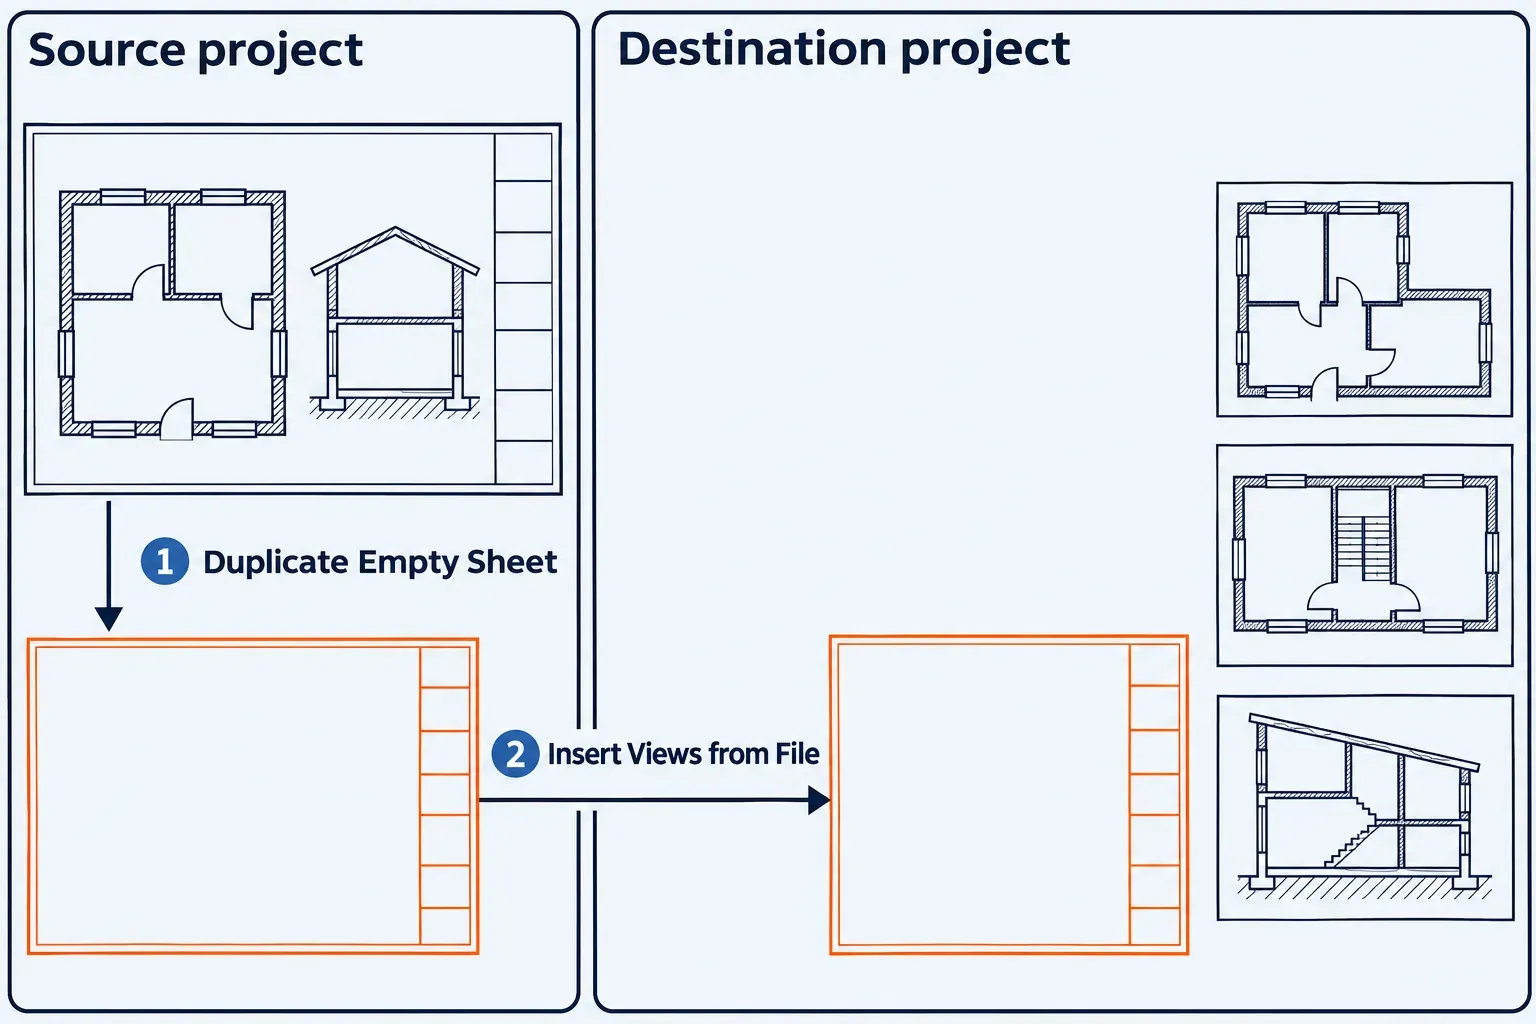
With many sheets, the same guidance offers a bulk route: in a separate copy of the source project, delete the model views, then insert that copy's sheets into the destination. For a sheet that mixes model views with drafting details, insert the drafting views on their own, then create the destination sheets and place the new project's plans and sections around them.

To reuse the old title block on sheets you create in the destination, the same guidance edits its family in the source project and loads that family into the new project. Transfer Project Standards does not bring loaded title-block families with it.
Copy a placed legend between the open projects
A legend already placed on a sheet has a documented route into another model's sheet view. Copy a Legend View explicitly includes that cross-model case; its Aligned to Selected Views option instead lists sheets in the current model.
- With both projects open, open the source sheet and select the placed legend.
- Use Modify | <Element> tab > Clipboard panel > Copy.
- Switch to the destination project's sheet view.
- Choose Modify tab > Clipboard panel > Paste drop-down > Paste from Clipboard and click to place the legend; the pasted selection stays selected for adjustment until you click away from it. On a destination sheet laid out like the source, Aligned to Current View in the same drop-down pastes the legend aligned onto that sheet instead, keeping its position.
- Compare the pasted legend with that sheet's notes and model views.
For other selections, the clipboard procedure copies eligible selected elements, including into another project, but Autodesk also lists elements and combinations that cannot be copied. Check that the selection is supported before using this route. Use Copy to Clipboard when switching views or projects; the ordinary Copy tool places its copy immediately.
Transfer only the standards the destination needs
Transfer Project Standards changes project resources. Its documented list includes system-family types and materials, plus graphics resources such as line weights and object styles. View templates and annotation styles can be transferred. The command also covers discipline settings and print settings. Loaded families are excluded from that list, so this command is not a substitute for obtaining the intended title-block family or assembling a sheet.
- Keep the source and target projects open, and activate the target.
- Click Manage tab > Settings panel > Transfer Project Standards.
- In Select Items to Copy, set Copy from to the source project.
- Select the required standards and click OK.
- If Duplicate Types appears, choose deliberately: New Only adds new standards and ignores duplicate types; Overwrite also overrides duplicate types; Cancel stops the operation.
I'd start with New Only when the destination's existing types must stay authoritative. Use Overwrite only when replacing those matching definitions is the intended change. Autodesk's standards transfer documentation also says referenced objects are included: bringing in a wall type can bring its material with it. Review the affected destination views after the transfer.

If a transferred sheet label displays a value but won't let you edit it, check the destination's project parameters. Autodesk's sheet transfer guidance identifies missing project parameters in sheet labels as one cause and points to Transfer Project Standards to bring them across.
Put the reusable sheet framework in an RTE
Repeated view and sheet setup belongs in the next project's starting file. Autodesk's sheet-template workflow starts with a blank project: create standard levels and named empty views, create sheets with the desired title blocks, and place the views using the intended viewport and view-title types. Save that empty project as a project template.
A project made from that template starts with those views and sheets in the Project Browser; the placed views update as its building model is drawn. Keep old-project geometry and notes out of a framework intended to start a different building.
The project template format is RTE. Sheet transfer stops at three points: a source saved in a newer release than the destination, an LT project asked to insert views and sheets from a full Revit file, and model views, which these routes leave for the destination model to supply. If LT sits on one side of the exchange, check what Revit LT can and can't do before building the next project's sheets around it.