Rhino to Revit: import 3DM models and send Revit geometry back
Choose the right home for a Rhino shape in Revit, preserve its units, and use a documented STEP route to bring Revit geometry back into Rhino.

Full Revit 2027 imports a Rhino 3DM file through Insert tab > Import panel > Import CAD. The result is a categorized 3D shape whose geometry you continue to edit in Rhino. Use a loadable family when the piece needs repeated instances; for the return trip, Revit 2027 can export STEP geometry that Rhino 8 can import.
The steps below follow Revit 2027 and Rhino 8 for Windows. Revit LT doesn't import SAT or 3DM files, and the STEP return trip and Rhino.Inside.Revit need full Revit too, so stop at that edition boundary before preparing files. A family wrapper doesn't remove it.
Choose where the shape should live
Choose the transfer route first. Use Link CAD for a 3DM that will keep changing, Import CAD for a fixed shape that needs a Revit category, or Rhino.Inside.Revit when you need native walls or floors. The import steps below suit the fixed-shape route.
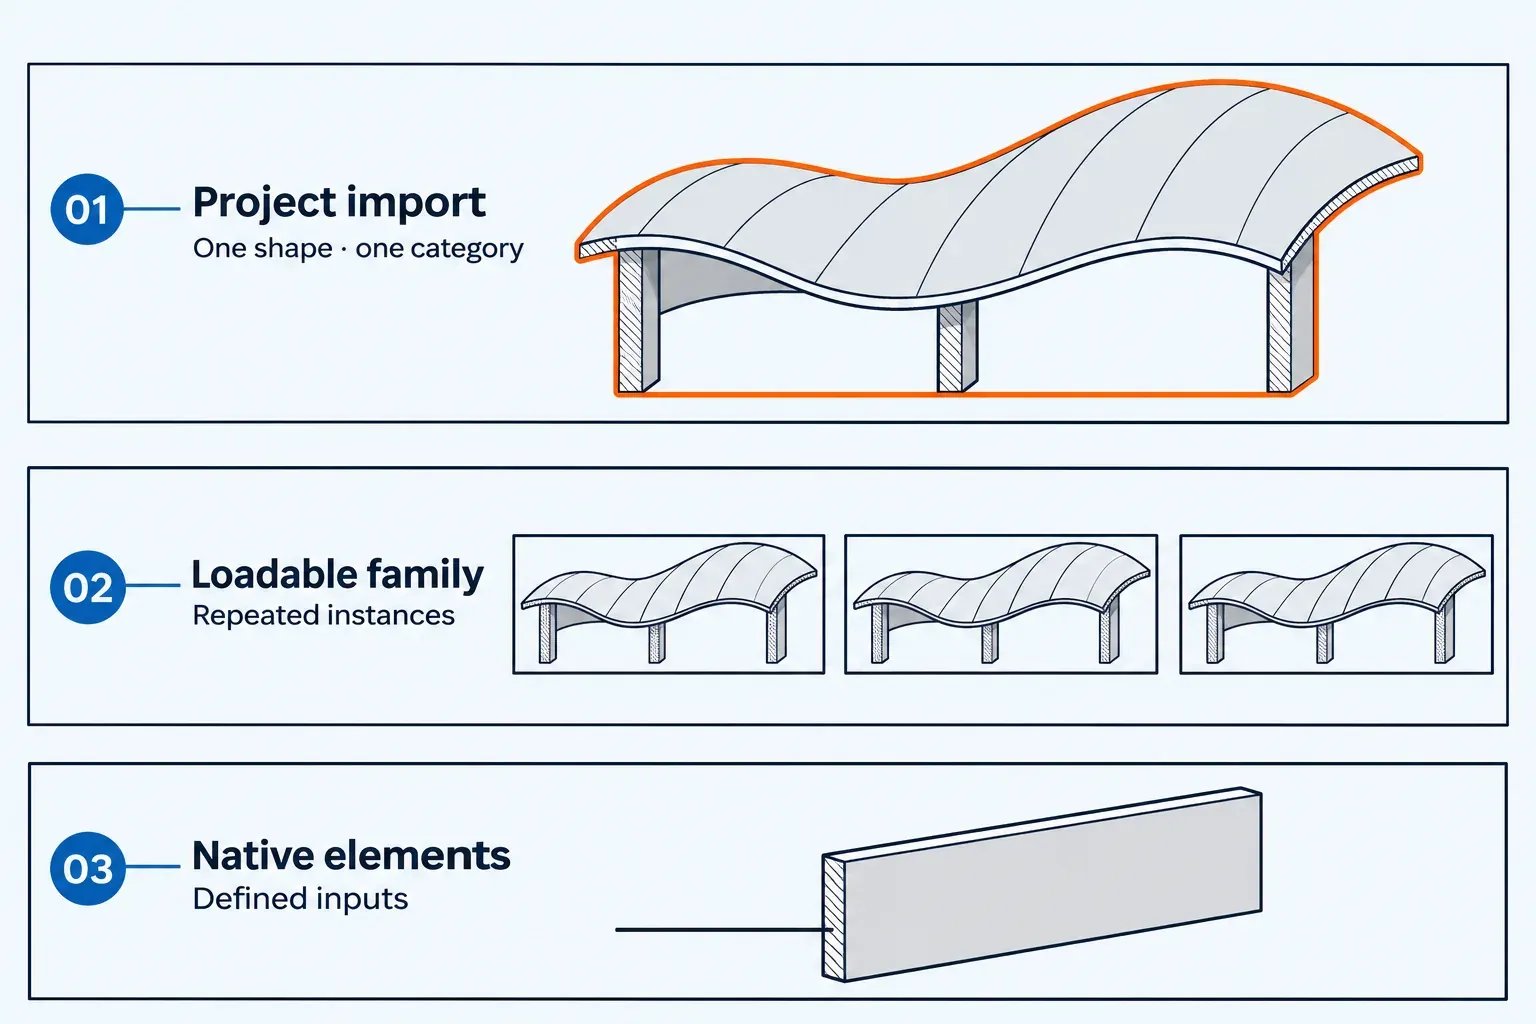
For an import, choose the container according to the number of instances and the Revit behavior you need. Autodesk's 3D-shape rules distinguish a project import from geometry placed inside a family.
| Set it here | It reaches | Choose it when |
|---|---|---|
| Directly in the project | One imported element, with one category for its whole shape | You need a static form in this project |
| Inside a loadable family | The family category and the instances of that family | The same piece needs to be placed repeatedly |
| Inside an in-place family | A custom element created in this project's context | The geometry is unique to this project or needs project-specific relationships |
| As native elements through a defined workflow | Actual Revit walls, floors or other supported elements | The recipient needs their native parameters and behavior |
I'd import a single study form into the project because that keeps its one-element scope visible. For repeated components, put the shape in a loadable family. Reserve in-place elements for unique project geometry: unlike loadable families, their family types cannot be duplicated to make multiple types.
Giving a building-shaped import the Walls category assigns that category to the whole import, including its roof and floors. It does not separate those parts into native elements. If the parts need different categories, prepare separate geometry selections and separate 3DM handoff files.
A team that already shares an Autodesk Construction Cloud project can skip the 3DM file. The free Data Exchange Connector for Rhino supports Rhino 7 and Rhino 8 and signs in to those cloud projects to create and load exchanges. On the Revit side, the Windows-only Data Exchange Connector for Revit receives updates to the objects that changed in the Rhino model. Autodesk's release announcement says Rhino data is assigned to native Revit categories and loads as DirectShapes, so a form in the Walls category still isn't a native wall. The connector earns its setup when the Rhino form keeps changing and both sides work in that project. Without a shared project, use the 3DM import below; when the recipient needs editable walls or floors, go to Rhino.Inside.Revit.
Prepare the Rhino model before exporting 3DM
Start in a working copy of the Rhino model with the intended transfer objects identified. Choose one length you can recognize at both ends of the transfer, such as the width of a canopy bay, and record its physical size.
- Check Model units. In Rhino, open File > Properties and inspect the model's Units settings. Model units control geometry; Layout units control layouts. If you change the unit system, Rhino asks whether to scale the geometry. Answer according to the intended physical size. For example, a span of 1000 mm should still measure 1 m after a correct unit conversion.
- Organize the selection by its Revit destination. Use Rhino layers to separate the pieces you intend to import into different categories or families. In the Layers panel's selection controls, Select Objects excludes objects on sublayers; use Select Sublayer Objects when those children belong in the handoff. For Import CAD, a Rhino layer name is an organizing aid, not a Revit category assignment.
- Check the actual 3D geometry. Run Check on the selected objects and repair reported errors before export. A clean Check report is useful diagnosis, not a guarantee that Revit will accept every surface. The direct 3DM route cannot import a wireframe model, so construction curves alone are not a substitute for the intended 3D shapes.
- Keep a repeatable origin. Agree which source origin and model reference will locate the piece. Keep that arrangement for later revisions, and note the expected level and orientation in Revit. A file that appears at the right scale can still be in the wrong place.
- Export the selection as 3DM. Choose File > Export Selected, select the Rhino 3DM file type, name the handoff file and save it. Leave Save geometry only off for this handoff: that option omits layers, materials, properties, notes and units settings. Keep the editable source model alongside the exported file.
Revit can't fix units or the selection on the way in. Autodesk's general CAD options reference lists Layers and Import Units among the options that aren't available once SAT or 3DM is the file type, so the 3DM has to arrive at the right scale and with only the intended objects.
Import the 3DM and check it in another view
Open the destination Revit project and a 3D view so you can inspect the form. For the family route, open the intended loadable family in the Family Editor first; the imported shape will take that family's category.
- Choose Insert tab > Import panel > Import CAD. In Import CAD Formats, set Files of type to Rhino Files (*.3dm), then select your file. These are the controls in Autodesk's specific 3D-shape import procedure.
- For a project import, choose a supported category that matches the intended use. Generic Models is the documented default. The category affects tagging, schedules and section behavior; choosing Walls does not create a native wall.
- Under Positioning, choose Auto - Origin to Origin when the Rhino and Revit origins were agreed: the Rhino world origin lands on Revit's internal origin, which stays put however the geometry changes. Otherwise choose Auto - Center to Center for a one-off study form. Then set Place At to the level the form sits on. Autodesk's positioning reference rules out Center to Center for a file you'll re-import or for several files, because the calculated center moves when the extents change.
- Click Open. Locate the geometry in the 3D view, zooming as needed, and compare its placement with the agreed reference before continuing.
- Check the result in a section or elevation as well as 3D. Measure the same known length using eligible faces or reference planes. Check the base elevation and orientation, then try the tag or schedule the recipient needs. For a loadable family, place an instance in a project and perform those checks there.
A section that doesn't cut the shape isn't automatically a failed import. The assigned category controls whether an imported shape is cuttable. Revit also supports only some category behaviors for this geometry, so verify the actual form before relying on room boundaries, hosting or scheduling.
Keep edits with the source geometry
Import CAD creates the 3D geometry using DirectShape elements. It does not reconstruct the modeling history as wall layers, floor sketches or adjustable Rhino control points. Enclosing that shape in a family gives it a container; it does not make the shape itself parametrically editable in Revit.
An imported 3DM has no Reload. Revit keeps the version you imported and doesn't pick up later saves, so a change means editing in Rhino, exporting the 3DM again and re-importing it. Before replacing an import, save a Revit backup and identify dimensions, face-based attachments and other references that depend on it. Autodesk's revision route for imported shapes is to delete the old shape and re-import it, then re-establish dimensions, snaps and other behaviors such as hosted face-based families. Repeat the scale and section checks afterward, and plan that replacement work before attaching detailed documentation to the shape.
Linking keeps the connection instead. Insert tab > Link panel > Link CAD accepts Rhinoceros 3DM files, and a linked CAD file shows its current saved version each time the model opens; reload it to pick up changes saved while the model is open. The Category choice belongs to imports, though: the options reference offers it only when importing SAT or 3DM. I'd link the 3DM while the Rhino form is still moving and import it once tags, schedules or room bounds depend on its category.
Keep the editable Rhino model distinct from the handoff file and the receiving RVT. The roles of those containers are covered in Revit file types.
Send Revit geometry back to Rhino with STEP
For a Revit 2027 geometry handoff, use STEP: Revit documents STEP export from 3D views, and Rhino 8 documents STEP import. SAT, FBX and DWG each carry a catch. McNeel's supported file formats list shows ACIS SAT under Save/Export only, so a Revit SAT file has no listed way into Rhino. Revit's FBX export targets 3ds Max, with options that set how faceted the model is, and DWG carries solids only when the Solids tab of the DWG/DXF export setup is set to ACIS solids instead of Polymesh. Treat the result as geometry to work with in Rhino, with no promise that Revit wall types, constraints or model relationships make the return trip.
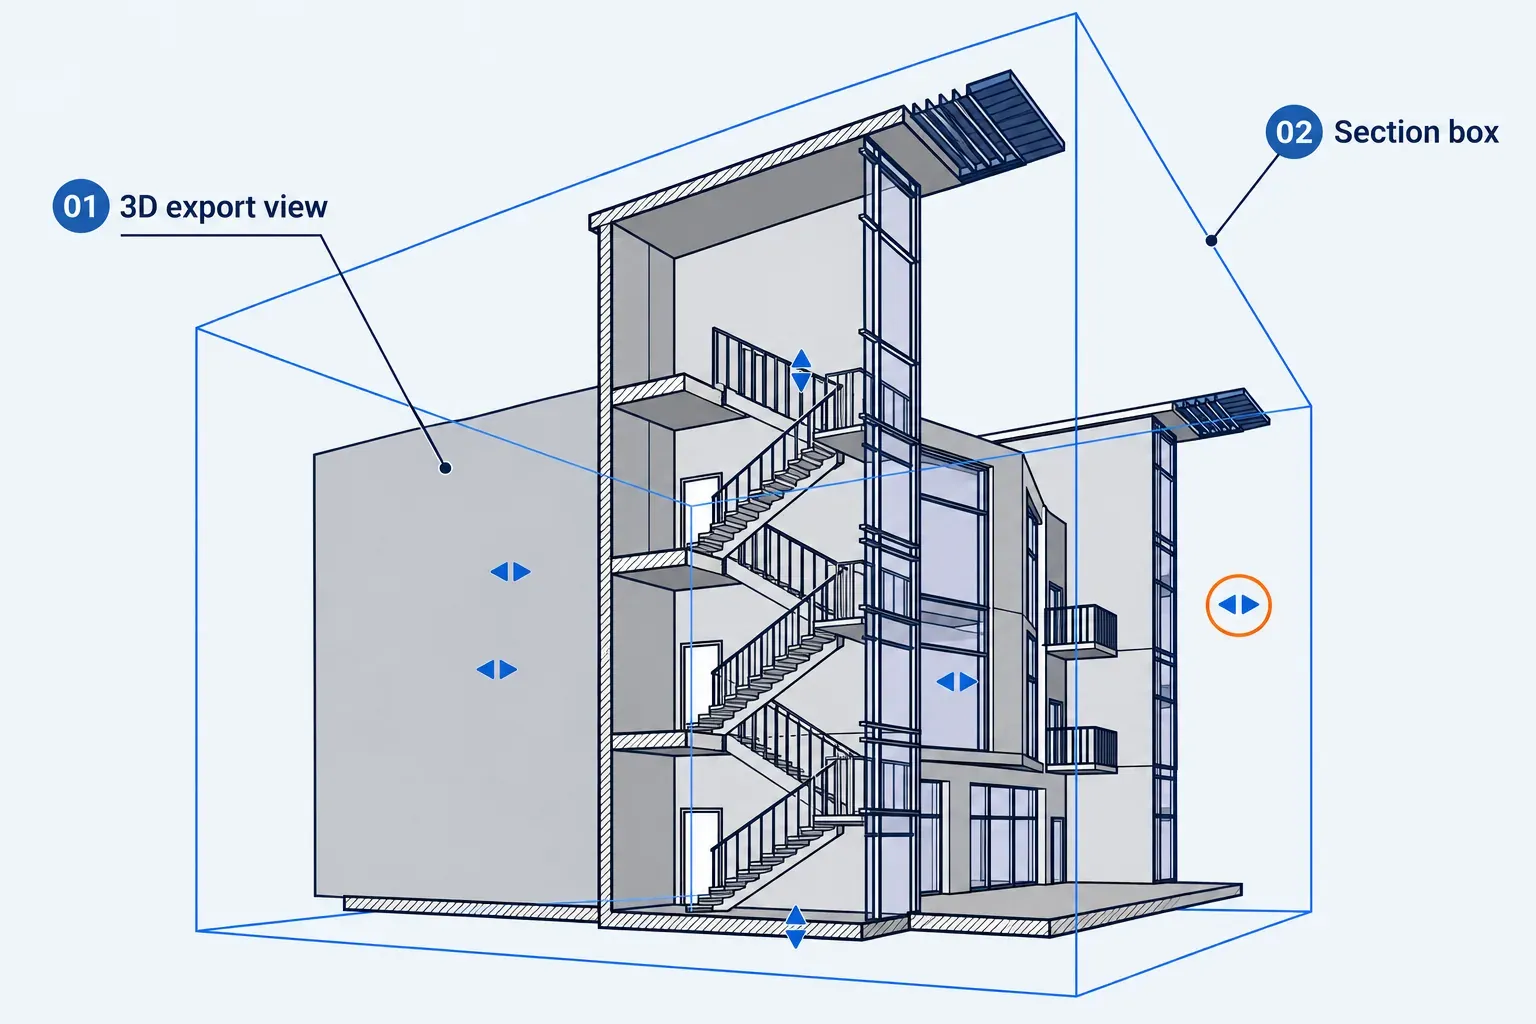
- Prepare a dedicated 3D export view. In the Project Browser, right-click the view and choose Duplicate View > Duplicate, then rename the copy. Use a section box to limit the exported area: Autodesk's partial 3D export procedure excludes elements completely outside that box. A 3D crop region does not perform this job. On the Properties palette, under Extents, select Section Box and click Apply. Select the box, then drag its face controls to adjust the bounds of the export view.
- With that 3D view active, choose File tab > Export > CAD Formats > STEP. In Export Settings, select <current view/sheet only>, or deliberately choose a view set if several views are required.
- Set the STEP Units and Schema for the receiving workflow. Click Next, choose the target folder and Naming option in Export CAD Formats, then click OK. Record the export units with the handoff.
- In Rhino, use File > Import, select the STEP file and click Open. Review STP Import Options. Rhino warns when units differ; importing STEP does not simply reset the Rhino document's units and tolerances. Confirm the model's intended units rather than dismissing that warning.
- Compare the same known length, location and overall form with the Revit export view. Inspect the surfaces you need for the next modeling operation, then save the Rhino model as 3DM for further work.
That export route is scoped to full Revit 2027. Revit LT 2027's CAD export list covers DWG, DXF, DGN, OBJ and STL, with no STEP or SAT. Check the export tools for the actual release before handing these steps to someone on an older version; older Revit releases have their own compatibility limits.
Use Rhino.Inside.Revit when you need native elements
Choose the add-on route when the task goes beyond a static shape. McNeel distinguishes direct shapes, loadable families and native Revit elements by the behavior the recipient needs. Rhino.Inside.Revit runs on Windows and embeds Rhino and Grasshopper in Revit. McNeel's current setup guide lists Revit 2018 through 2027 and Rhino 7, 8 or 9; Rhino must be licensed. Match the installed builds to that guide before choosing the workflow. Revit LT is out here as well: the add-on works through the Revit API, and Autodesk's LT comparison says LT isn't intended to support an API.
McNeel's guide distinguishes extracting geometry from creating native elements. With the supported software already available, a Graphical Element parameter under Params > Revit can select a Revit object; passing it to Element Geometry under Revit > Elements produces Rhino Breps in Grasshopper. That preview is a geometry output, not a saved 3DM file.
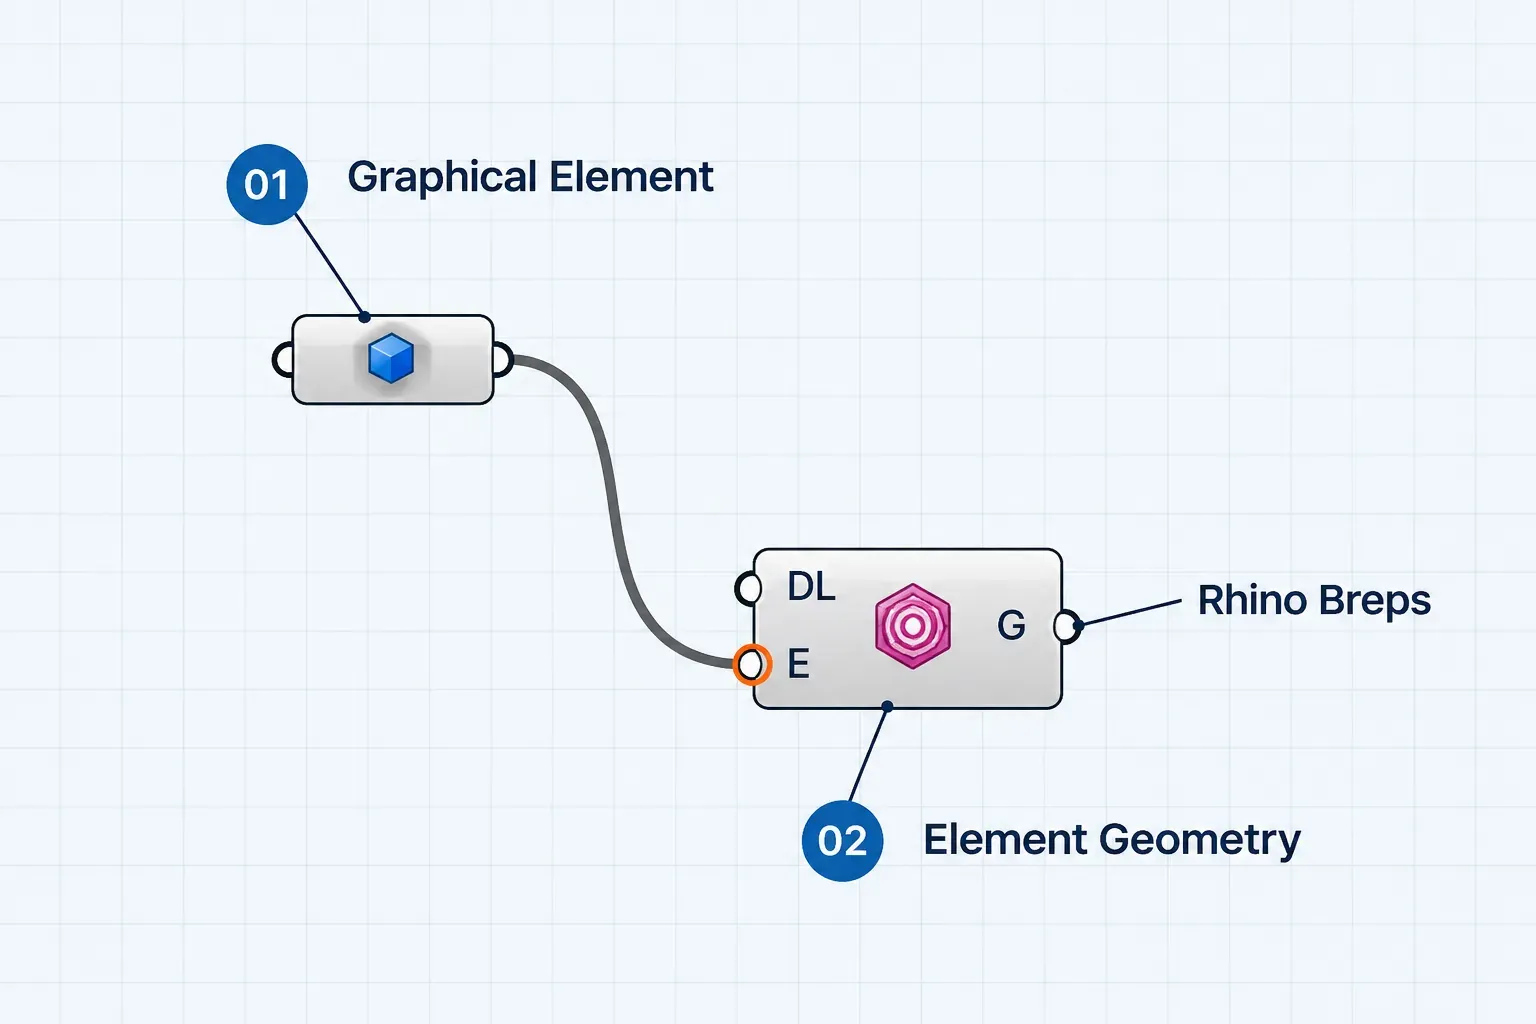
Going the other way, the guide's Add Wall (Curve) example needs a basis line, wall type, host level and height. Those inputs create a native Revit wall. Sending an arbitrary form as a DirectShape does a different job, even if it has the Walls category. Define which native elements the recipient needs before building the Grasshopper definition.
For a changing multidisciplinary model, agree how revisions and positioning will be coordinated before choosing the transfer method. The import route stops at a static, categorized shape: it won't follow later Rhino saves or become native walls and floors. When the receiving project needs ongoing coordination rather than one shape, continue with linked model coordination.